Onboarding
Everything starts here - creating a service account is the very first step for merchants to begin integrating with our platform.
ImportantThis page is under active development, its structure and contents are subject to change.
NoteIf you already have the
credentials.jsonfile containing all the necessary details, just skip this step.
Welcome, friend! If this is your first time exploring our platform, you’re in for a smooth and straightforward journey. Together, we’ll walk through a few simple yet essential steps to get you started. This includes setting up your account password, enabling two-factor authentication (2FA) for added security, and configuring your very first project on our platform. Don’t worry—we’ll also guide you through setting up the right security level to ensure all your operations are safe and secure. Ready to dive in? Let’s get started!
Initial setup
Follow these brief steps to create a service account:
Changing password
Once you log in to the system, you’ll be prompted to change your account password.
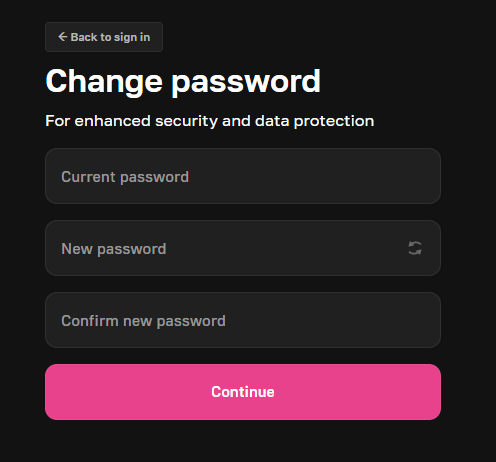
ImportantWe recommend using a strong password to ensure your account remains secure.
Setting up 2FA
After creating your new password, you’ll be prompted to set up two-factor authentication (2FA). At this stage, you’re just beginning the 2FA setup. You don’t need to enter a confirmation code yet—your first step is to download an authenticator app to your smartphone. Below, you’ll find links to download the app:
| Platform/Store | Application |
|---|---|
| iOS - App Store | |
| Android - Google Play | |
| APKs for other platforms |

Once you’ve installed the authenticator app on your smartphone, you’ll need to scan the QR code displayed on your screen.
ImportantPlease note: This is not the QR code shown in the screenshot in this documentation but the one you see during the setup of your Merchant account in your web browser.
After scanning the QR code with your authenticator app, a 6-digit code will appear in the app. Enter this code on the web browser page. That’s it! You’ve successfully enabled 2FA for your Merchant account.
Once you’ve connected your 2FA app and provided a valid 6-digit code, you’ll be prompted to log in again using your new password.
Onboarding wizard
After you log in, the Onboarding wizard dialog appears.
Because you don’t have any projects set up yet, this wizard will guide you through creating your first project in under two minutes.
NoteRegardless of how you configure your settings in the Onboarding wizard, you can always update them later in your dashboard.
By default, your account is assigned a Medium security level. For more details on security levels, see this section.
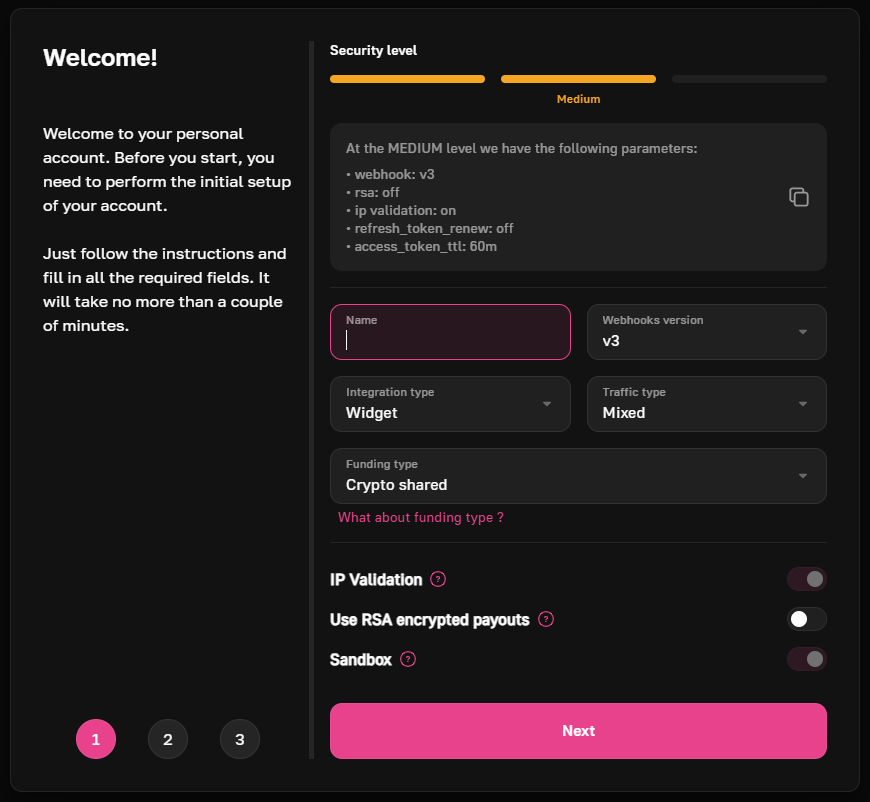
Choosing security level
Before you begin filling in the fields of the Onboarding wizard, please note the Security level bar, which is an action item within the dialog.

By clicking its elements, you can select a security level for your project. Below is a table that describes each level in detail:
| Security Level | Specifications | Commentary |
|---|---|---|
| Low | • webhook: v1 • rsa - off• ip validation: off• refresh_token_renew: off• access_token_ttl - 24h | This level provides basic security with minimal restrictions. Note that webhook v1 will be deprecated by May 1, 2025, and IP validation is disabled, making it less secure for sensitive operations. |
| Medium | • webhook: v3 • rsa: off• ip validation: on• refresh_token_renew: off• access_token_ttl: 60m | A balanced option with webhook v3 and IP validation enabled, offering improved security. However, RSA and refresh token renewal remain disabled, leaving some areas less protected. |
| High | • webhook: v3 • rsa: on• ip validation: on•refresh_token_renew: on• access_token_ttl: 10m | The most secure level, featuring webhook v3, RSA for critical requests, IP validation, and frequent refresh token renewal. Ideal for projects requiring stringent security measures and minimal risk exposure. |
Providing essential information
On the first screen of the Onboarding wizard, after selecting the Security level, fill in the information described in detail in the table below:

| Entity | Possible Value/Example | Commentary |
|---|---|---|
| Name | Example: Project 1 | The name of the project. |
| Webhooks version | Possible values:
| It is recommended to always use v3. Version v1 will be deprecated on May 1, 2025, and from that date, all v1 webhooks will be forcibly switched to v3. Version v2 will remain unaffected. For more details, see the Webhooks section. |
| Integration type | Possible values:
| To learn more about integration types, see this section. |
| Traffic type | Possible values:
| Specify the type of traffic handled by your project. If unsure, consult your technical team. |
| Funding type | Possible values:
| This setting determines the financial support mode for transactions in the current project, allowing you to choose how transactions are processed and calculated. There are two primary modes of operation in the system: Fiat:
|
| IP validation | ON by default | Enables or disables IP address whitelisting for incoming API requests. The IP whitelist is set when you create a service account. |
| Use RSA encrypted payouts | OFF by default | Allows you to enhance security by adding an extra layer of authentication for critical requests (e.g., withdrawals or creating a payment transaction) via API. For more information, see the Webhooks section. |
| Sandbox | ON by default | Lets you test our platform without using real money. Suitable for integration testing. For a live project, disable this mode. |
Once everything is configured, click Next to continue.
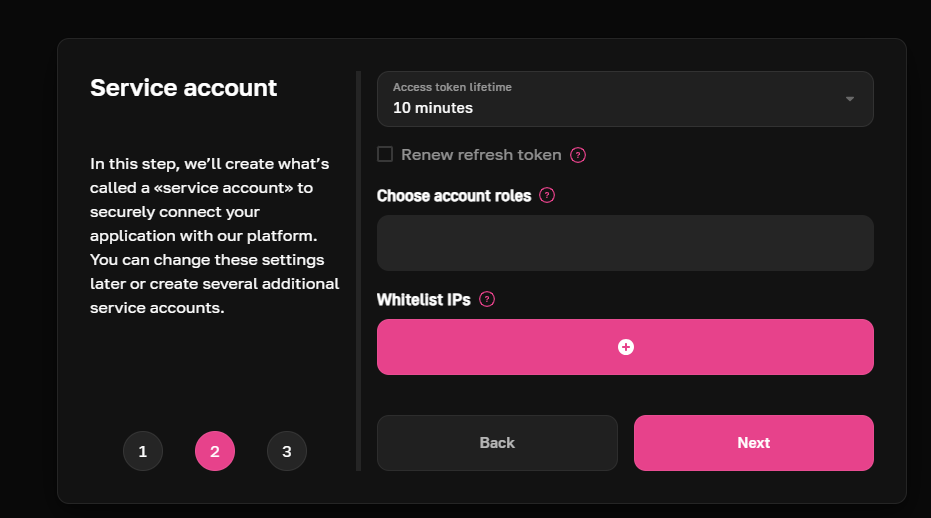
Setting up account roles
On the second screen of the Onboarding Wizard, you can configure additional project options.
-
Access token lifetime: Set the Access token lifetime (in minutes).
-
Renew refresh token: Determines how the refresh token behaves. According to the OAuth specification, the refresh token should change every time you refresh the primary token, but you can opt to keep the same token until its lifetime expires.
-
Choose account roles: Assign one or more roles for the project:
Role Commentary Payin Role allowing the creation of deals Get deal statistic for merchant API Role enabling the request of statistics and information on deals Create support request Role allowing the creation of support tickets Reports Role allowing the generation of reports with deal statuses Money Role enabling operations with the merchant's personal account
NoteIf you’re unsure which roles to select for your project, choose all of them.
- Whitelist IPs: Specify IP addresses (including netmasks like 10.123.12.0/24) that are allowed to access our API. Requests from addresses not on the whitelist will be denied. If you are not ready to configure this now, you can do it later.
Click Next to continue.
Adding your team
It’s time to add your team members to the project! You likely have managers, accountants, technical specialists, and other employees who may need access to the platform. At this step, you can add them by name and assign each one a suitable role. This ensures they can only perform specific operations without risking interference with unrelated data.
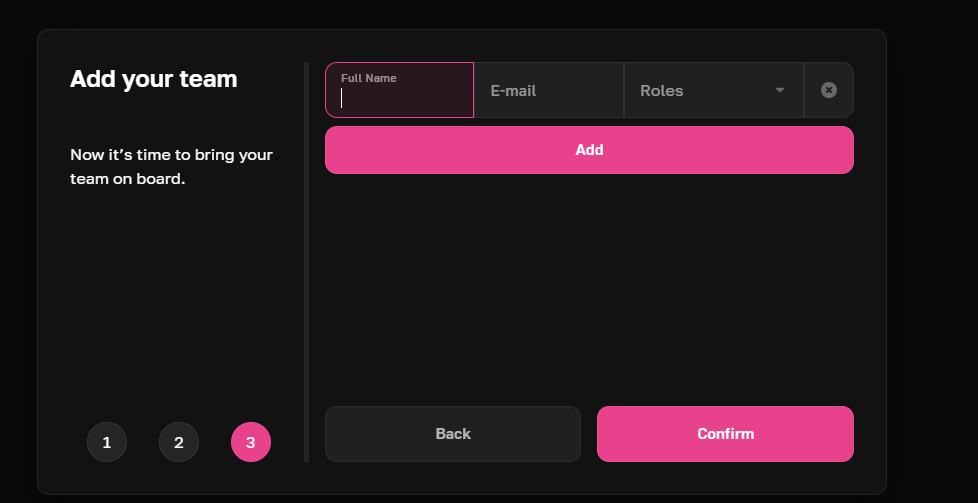
Provide each teammate’s full name, email address, and assign them a role in the system.
Once everything is set up, click Confirm to complete the onboarding process.
You've Completed the Onboarding
Congratulations! Your integration setup is complete. Here are your API keys—download them and share them with your development team along with our documentation link. Make sure to keep these keys safe and only share them with trusted individuals, as they’re critical to your platform’s security.
Good luck with your first project on our platform!
Updated over 1 year ago